Windows 10 Automatic Repair Loop? Fix Without USB (Easy Method) — if your PC keeps restarting and showing the “Preparing Automatic Repair” or “Diagnosing your PC” screen again and again, you’re not alone. This frustrating issue prevents Windows from loading normally and can make users think their system is permanently damaged.
The good news is that in most cases, you do NOT need a USB boot drive or fresh Windows installation to fix it. In this complete step-by-step guide, you’ll learn safe, beginner-friendly methods to stop the automatic repair loop while keeping your files intact.
This guide is written especially for home users who want practical solutions that actually work.
What Is the Windows 10 Automatic Repair Loop?
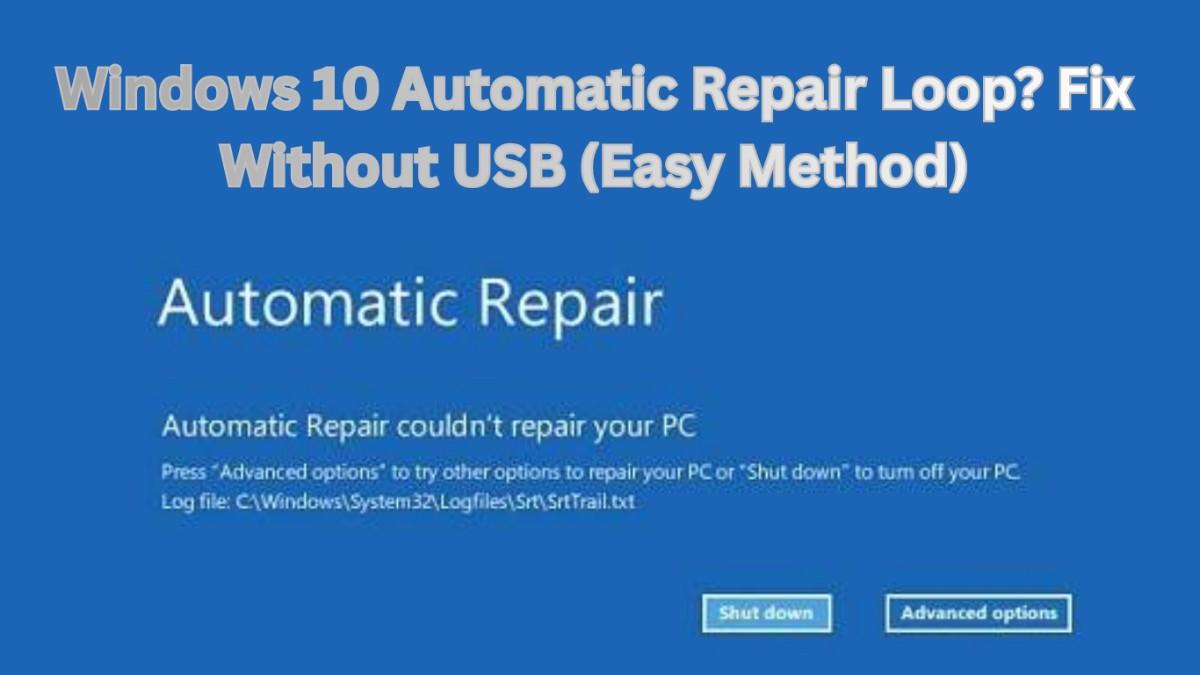
The Windows 10 Automatic Repair Loop happens when Windows fails to boot properly and repeatedly tries to repair itself but cannot complete the process. Instead of starting normally, the system keeps restarting and returning to the repair screen.
Common messages include:
- Preparing Automatic Repair
- Diagnosing your PC
- Automatic Repair couldn’t repair your PC
- Your PC did not start correctly
When this happens, Windows enters recovery mode repeatedly — creating an endless loop.
Why Does the Automatic Repair Loop Happen?
Understanding the cause helps you apply the right fix. The most common reasons include:
- Corrupted system files
- Failed Windows updates
- Damaged boot configuration (BCD)
- Sudden power shutdown
- Faulty drivers
- Disk errors or bad sectors
- Incorrect registry changes
Luckily, most of these problems can be repaired using built-in recovery tools already present inside Windows.
Before You Start (Important Safety Tip)
Before applying fixes:
- Disconnect external USB devices (except keyboard/mouse)
- Remove external hard drives
- Ensure your laptop has enough battery or keep it plugged in
These small steps prevent boot conflicts.
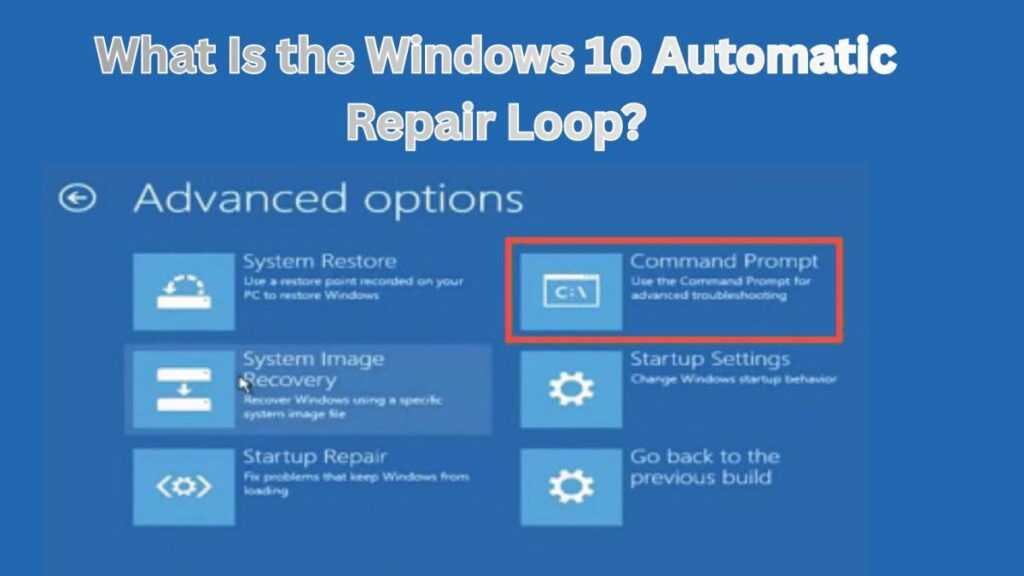
How to Access Advanced Startup Options (Without USB)
Since Windows isn’t loading, you must manually open recovery options.
Method:
- Turn on your PC.
- When Windows logo appears, force shut down by holding the power button.
- Repeat this process 2–3 times.
- Windows will automatically open Advanced Startup Recovery.
Now select:
Troubleshoot → Advanced Options
All fixes below start from here.
Fix 1: Run Startup Repair Properly
Sometimes Startup Repair fails once but works on retry.
Steps:
- Go to Advanced Options
- Click Startup Repair
- Select your Windows account
- Enter password if asked
Wait patiently — this may take several minutes.
👉 Restart after completion and check if Windows boots normally.
Fix 2: Disable Automatic Repair Loop (Very Effective)
This method stops Windows from repeatedly forcing repair mode.
Steps:
- Open Advanced Options
- Click Command Prompt
- Type the following command:
bcdedit /set {default} recoveryenabled No
Press Enter.
Now restart your PC.
If the loop was caused by a recovery trigger error, Windows should load normally.
Fix 3: Repair Boot Configuration (No USB Needed)
Boot configuration corruption is one of the biggest causes of the Windows 10 Automatic Repair Loop.
Steps:
Open Command Prompt again and run these commands one by one:
bootrec /fixmbr
bootrec /fixboot
bootrec /scanos
bootrec /rebuildbcd
Press Enter after each command.
What this does:
- Rebuilds boot records
- Repairs startup data
- Fixes corrupted boot manager
Restart your PC afterward.
Fix 4: Run System File Checker (SFC Scan)
Corrupted Windows files often trigger repair loops.
Steps:
In Command Prompt, type:
sfc /scannow
If Windows partition isn’t detected, use:
sfc /scannow /offbootdir=C:\ /offwindir=C:\Windows
The scan may take 10–20 minutes.
This tool automatically repairs damaged system files.
Fix 5: Check Disk Errors (Highly Recommended)
Hard drive errors can prevent Windows from booting correctly.
Run this command:
chkdsk C: /f /r
What it does:
- Fixes file system errors
- Repairs bad sectors
- Restores readable data
⚠️ This scan may take time depending on disk size.
Fix 6: Use System Restore (Without Losing Files)
If the problem started after an update or driver installation, System Restore is extremely useful.
Steps:
- Go to Advanced Options
- Select System Restore
- Choose a restore point before the issue started
- Follow on-screen instructions
Your personal files remain safe.
Fix 7: Uninstall Recent Updates
Windows updates sometimes cause boot failures.
Steps:
- Open Advanced Options
- Click Uninstall Updates
- Choose:
- Uninstall latest quality update
- OR uninstall feature update
Restart and check.
Fix 8: Disable Early Launch Anti-Malware Protection
Rarely, security drivers block startup.
Steps:
- Go to Startup Settings
- Click Restart
- Press 8 or F8
- Select Disable early launch anti-malware protection
This allows Windows to boot normally if a driver conflict exists.
Fix 9: Boot Into Safe Mode
Safe Mode helps confirm whether drivers or apps caused the issue.
Steps:
- Advanced Options → Startup Settings
- Restart
- Press 4 for Safe Mode
If Windows boots successfully:
- Remove recently installed drivers
- Uninstall suspicious software
- Update graphics drivers
Also Read: What to Do If Your Computer Gets Virus Warning Pop-Ups (Step-by-Step Guide)
Fix 10: Reset Windows (Last Option Without USB)
If nothing works, you can reset Windows without losing files.
Steps:
- Troubleshoot → Reset this PC
- Choose Keep my files
This reinstalls Windows while preserving personal data.
How to Prevent Automatic Repair Loop in Future
After fixing the Windows 10 Automatic Repair Loop, follow these tips:
- Avoid forced shutdowns
- Keep drivers updated
- Maintain at least 20GB free disk space
- Use reliable antivirus
- Create restore points regularly
- Avoid registry cleaners from unknown sources
Prevention saves hours of troubleshooting later.
Also Read: How to Clean Storage Space in Windows Without Deleting Important Files
Frequently Asked Questions (FAQs)
Can I fix the Windows 10 Automatic Repair Loop without reinstalling Windows?
Yes. Most cases are caused by boot or system file corruption that can be repaired using Command Prompt tools.
Will I lose my files during these fixes?
No. All methods in this guide are safe and designed to keep personal files intact.
Why does Automatic Repair fail repeatedly?
Usually because Windows cannot repair corrupted boot records or system files automatically.
Do I need a USB boot drive?
No. Every method explained here works using built-in recovery options already inside Windows.
How long does repair take?
Startup Repair may take 5–20 minutes, while disk scans can take longer depending on drive size.
Also Read: Wi-Fi Connected but Internet Not Working on PC? Try These Easy Solutions
Final Thoughts
Facing a Windows 10 Automatic Repair Loop? Fix Without USB (Easy Method) is absolutely possible if you follow the correct steps calmly. In most situations, the problem is not hardware failure but corrupted startup data — something Windows recovery tools can repair easily.
Start with Startup Repair, move to boot repair commands, and only reset Windows as a last option. By following this structured approach, you can bring your PC back to life without losing files or spending money on reinstallations.
If this guide helped you, consider bookmarking SolvingDad.com for more practical Windows troubleshooting tutorials designed for real users — not just technicians.
Also Read: