How to create a bootable USB for Windows installation and recovery is one of the most common questions I get from readers. Whether your computer is running slow, refusing to start, or you simply want to install a fresh copy of Windows, having a bootable USB drive is a lifesaver.
The good news? You don’t need to be a tech genius to do it. In this guide, I’ll walk you through everything step by step—like I would explain it to a friend sitting right next to me.
So grab a USB drive, make yourself a cup of tea (or coffee, no judgment here), and let’s get started.
Why You Need a Bootable USB
Before we jump into the process, let’s quickly talk about why creating a bootable USB for Windows installation and recovery is important:
- Reinstall Windows easily if your system crashes.
- Repair startup issues with built-in recovery tools.
- Upgrade or clean install Windows without relying on DVDs.
- Carry Windows installer in your pocket—handy for multiple PCs.
It’s like having a first-aid kit for your computer—small but powerful.

What You’ll Need
To create a bootable USB for Windows installation and recovery, here’s the checklist:
- USB Drive – At least 8GB storage (16GB recommended for newer Windows versions).
- Stable Internet Connection – To download the Windows ISO or Media Creation Tool.
- Windows ISO File or Media Creation Tool – Officially from Microsoft.
- A Computer – That’s working (so you can prepare the USB).
Also Read: How to Use Microsoft Copilot on Windows 11: A Practical Beginner’s Guide (2025)
Method 1: Using Windows Media Creation Tool (Easiest Way)
The Windows Media Creation Tool is Microsoft’s official and most reliable method.
- Go to Microsoft’s official website and download the Media Creation Tool.
- Plug in your USB drive (make sure to back up any data, because it will be erased).
- Run the tool and accept the license agreement.
- Select “Create installation media (USB flash drive, DVD, or ISO file)” and click Next.
- Choose the language, edition, and architecture (usually 64-bit).
- Select USB flash drive as the media type.
- Pick your USB drive from the list and hit Next.
The tool will download Windows and create the bootable USB automatically. Easy, right?
Method 2: Using Rufus (For More Control)
If you prefer more customization, Rufus is a free third-party tool.
- Download Rufus from rufus.ie.
- Plug in your USB drive.
- Open Rufus and select your USB drive under Device.
- Click Select to choose your downloaded Windows ISO.
- Choose Partition Scheme (GPT for UEFI, MBR for Legacy BIOS).
- Keep other settings default and click Start.
In a few minutes, you’ll have a fully working bootable USB.
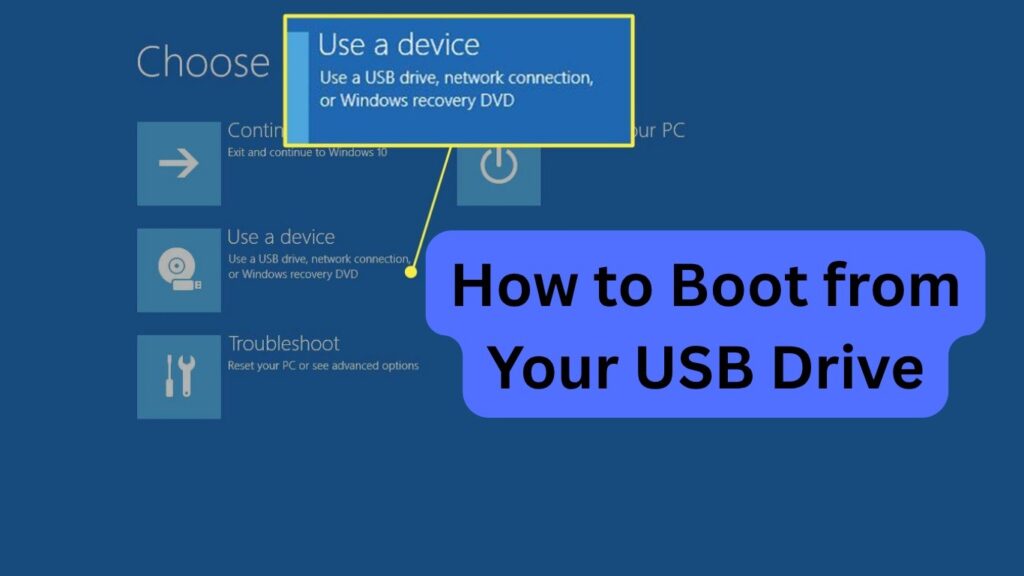
How to Boot from Your USB Drive
Once you’ve created your bootable USB for Windows installation and recovery, here’s how to use it:
- Insert the USB into your PC.
- Restart your computer.
- Enter the boot menu (usually by pressing F12, F9, Esc, or Del—depends on your computer brand).
- Select your USB drive as the boot device.
- Follow the on-screen instructions to install or repair Windows.
Tip: If you want to repair Windows instead of reinstalling, choose “Repair your computer” when the setup screen appears.
Common Problems and Fixes
Even when you know how to create a bootable USB for Windows installation and recovery, you might run into issues. Here’s how to fix them:
- USB not detected? Try another USB port or reformat your drive.
- Wrong partition scheme error? Use GPT for UEFI and MBR for Legacy BIOS.
- Download too slow? Use a wired connection instead of Wi-Fi.
- PC won’t boot from USB? Change boot order in BIOS settings.
Also Read: How to Reset Windows 11 Without Losing Data (Step-by-Step Guide)
Pro Tips
- Always safely eject your USB after creating it to avoid corruption.
- Keep your USB drive dedicated to Windows installation—don’t use it for random file storage.
- Update your bootable USB once in a while so you always have the latest Windows version ready.
FAQs: How to Create a Bootable USB for Windows Installation and Recovery
Q1. Can I create a bootable USB on a Mac or Linux computer?
Yes, you can. Tools like Rufus alternatives (BalenaEtcher, UNetbootin) work across operating systems.
Q2. How big should my USB be?
For Windows 10 or 11, a minimum of 8GB is required, but 16GB is recommended.
Q3. Do I need an internet connection?
Yes, if you’re downloading the Windows ISO or using the Media Creation Tool.
Q4. Can I use the same USB for storing other files?
Technically yes, but it’s better to keep it dedicated for reliability.
Q5. Will creating a bootable USB delete my files?
Yes, the process wipes the USB completely. Always back up your data first.
Final Thoughts
Now you know exactly how to create a bootable USB for Windows installation and recovery—step by step, without confusion. Whether you use Microsoft’s official tool or Rufus, the process is simple once you’ve done it once.
Think of this USB as your Windows “lifeline.” Whenever your PC gives you trouble, you’ll have the power to fix it in your pocket.
So, go ahead and create yours today—you’ll thank yourself later.
Also Read: